


View the complete article here.
Winter takes a toll on asphalt. Freeze-thaw cycles, plowing, and de-icing chemicals leave behind cracks, potholes, and raveled surfaces that can turn a smooth road into a contractor’s headache. As spring kicks off, now’s the time to assess the damage and get pavements back in shape before heavier traffic and summer heat set in. This guide walks you through the essential steps—inspection, repair, and prevention—to prep asphalt for the season ahead, with equipment tips to keep your crew efficient and your projects on track.
Step 1: Assessing Winter Damage
Before you roll out the paver, you need to know what you’re dealing with. Winter’s harsh conditions—temperature swings, moisture infiltration, and mechanical stress—hit asphalt hard. Here’s what to look for:
- Cracks: Hairline fractures or alligator cracking from freeze-thaw expansion.
- Potholes: Broken-out sections where water seeped in and weakened the base.
- Surface deterioration: Raveling or fading from salt and plows.
Step 2: Targeted Repairs
Spring weather can be unpredictable—wet one day, warm the next—so prioritize repairs that stabilize the pavement fast.
- Crack filling: Seal cracks with hot rubberized sealant to block water ingress. A backpack crack filler or pour pot speeds up small jobs.
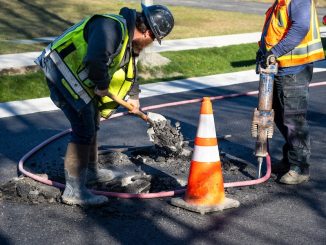
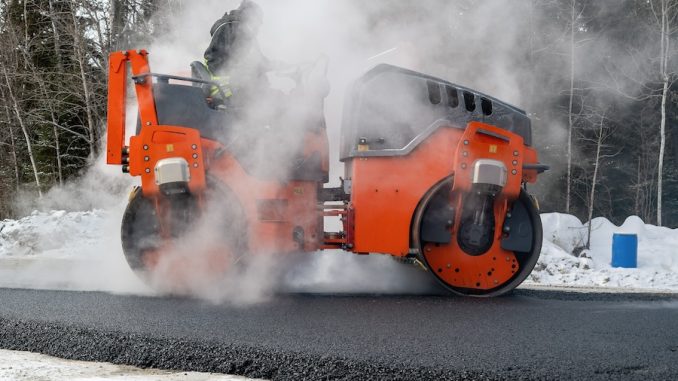
- Pothole patching: For quick fixes, cold patch asphalt works in a pinch, but hot mix with a tack coat offers longer-lasting results. Compact with a vibratory plate for a tight bond.
- Base stabilization: If potholes signal subbase failure, excavate, add crushed aggregate, and compact before patching—skip this, and you’re just delaying the inevitable.
Step 3: Prevention Through Maintenance
Repairs are only half the battle. Spring prep is about setting asphalt up to survive the year ahead.
- Sealcoating: Apply a coal tar or asphalt-emulsion sealcoat to shield against UV rays and water. Use a squeegee or spray rig for even coverage—aim for dry days above 50°F.
- Drainage check: Clear debris from curbs and gutters; standing water is asphalt’s worst enemy. Consider regrading low spots with a motor grader if pooling persists.
- Surface cleaning: Sweep or blow off winter grit to prep for sealing or overlay work. A power broom attachment on your skid steer cuts labor time.
Equipment Essentials
The right tools make spring prep faster and more profitable:
- Pavement saw: For clean cuts around potholes or cracked sections.
- Hot box: Keeps asphalt mix at the right temp for patching—critical for early spring’s cool mornings.
- Sealcoat sprayer: Tank-and-wand systems beat manual spreading on larger jobs.
- Compactors: Vibratory rollers or plates to ensure repairs hold up under traffic.
Timing It Right in Spring
Spring’s transitional weather demands flexibility. Monitor forecasts—wet asphalt won’t take sealcoat, and cold snaps can slow curing. Aim for a dry stretch to pour hot mix or seal, and keep an eye on overnight lows—anything below 40°F risks weak bonds. If schedules tighten, additives like warm-mix asphalt can lower application temps without sacrificing quality.
Why It Matters
Skipping spring prep isn’t an option. Unaddressed winter damage snowballs into bigger failures—think heaved sections or full-depth blowouts—costing more in emergency repairs and downtime. A solid March plan keeps clients happy, roads safe, and your crew ahead of the summer rush. Plus, with municipalities and property owners budgeting for post-winter fixes now, it’s prime time to bid on maintenance contracts.
Final Thoughts
Spring asphalt prep is about playing smart defense. Inspect thoroughly, repair strategically, and protect proactively. With winter in the rearview and construction season heating up, March is your window to turn battered pavements into smooth, durable surfaces. Got your paver tuned up and your sealant loaded? Time to hit the ground rolling.
View the complete article here.
Use hot mix asphalt with a tack coat and proper compaction for a long-lasting pothole repair.
Sealcoat should be applied on dry days above 50°F with no rain or freezing temps in the forecast. What is the best way to repair asphalt potholes in spring?
When is the best time to apply sealcoat after winter?